

If you’ve ever stepped into your bathroom and noticed cracked tiles, loose panels, bubbling paint, or even a suspicious damp patch on the shower wall, you know the sinking feeling that comes with it.
A damaged shower wall isn’t just about looks—it’s a red flag for hidden water leaks, mold growth, and expensive repairs down the road.
The good news? You don’t need to call a contractor right away. With the right approach (and a bit of patience), you can fix a bathroom shower wall yourself—saving hundreds of dollars while making sure your bathroom looks fresh and stays safe.
1. Understand Why Shower Walls Fail
Before you start tearing things apart, it’s crucial to know why bathroom shower walls get damaged in the first place. Most issues aren’t just cosmetic—they point to deeper problems.
- Moisture buildup: Bathrooms are basically indoor rainforests. With shower humidity often reaching 100% during use, even the tiniest crack can let water seep in.
- Poor ventilation: According to the EPA, bathrooms without exhaust fans are three times more likely to develop mold behind walls.
- Aging grout or caulk: The thin lines you see between tiles may look harmless, but when grout or caulk cracks, water finds a highway straight into the wall.
- Cheap materials: Some builders use green board drywall instead of cement backer board. While it’s moisture-resistant, it’s not waterproof—and in high-use showers, it eventually breaks down.
When I moved into my first place, I thought repainting over a bubbling spot on the shower wall would fix it. Big mistake. Two months later, I had to rip out half the wall because mold had set up camp. Lesson learned: always find the root cause, not just the surface issue.
2. Spot the Signs of Shower Wall Damage
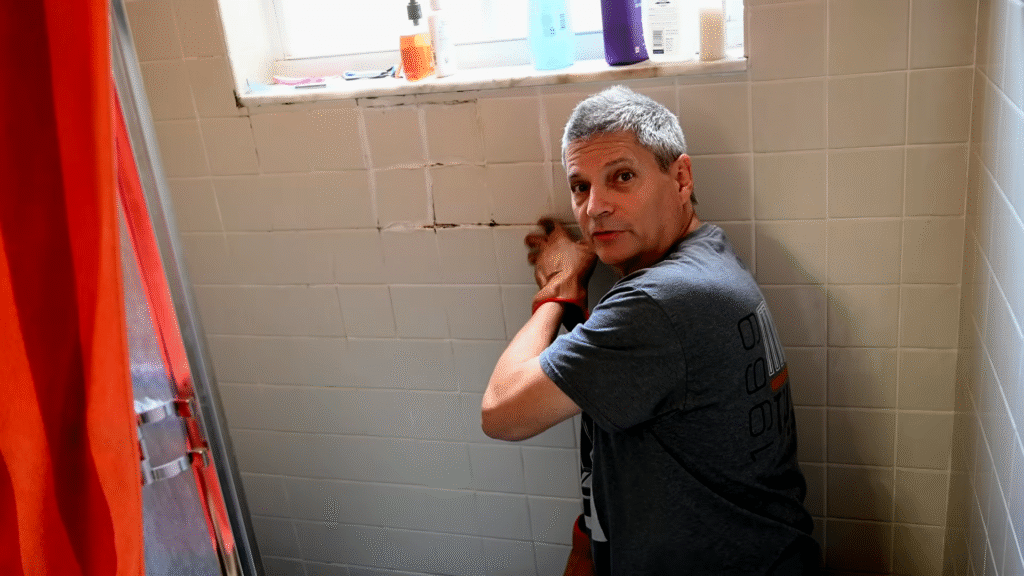
Not every problem shouts for attention. Some are quiet whispers that you might miss if you’re not looking closely. Here are warning signs that your shower wall needs fixing:
- Soft or spongy spots when you press the wall.
- Cracked or missing tiles around the shower area.
- Mold or mildew smell that doesn’t go away even after cleaning.
- Bubbling paint or peeling wallpaper near the shower.
- Water stains on the ceiling or walls in adjacent rooms.
Here’s a stat that might surprise you: The Insurance Information Institute reports that water damage accounts for nearly 30% of all home insurance claims, with the average claim costing over $11,000. Ignoring small shower wall problems can easily land you in that group.
3. Gather the Right Tools and Materials
Now, let’s talk about what you’ll need to get this job done. Having the right tools is half the battle, and trust me—improvising with a butter knife for grout removal is a road to frustration.
Tools:
- Utility knife
- Pry bar or putty knife
- Drill with mixing paddle (if replacing backer board)
- Notched trowel
- Tile cutter or wet saw (for tile repairs)
- Caulking gun
- Sponge and bucket
Materials:
- Cement backer board (if replacing sections)
- Waterproofing membrane (RedGard or similar)
- Thin-set mortar
- Replacement tiles (if tiled wall)
- Waterproof caulk
- Grout
- Mold-resistant primer and paint (if using drywall finish outside wet zone)
It may sound like a lot, but investing in the right materials ensures your fix lasts for years, not months.
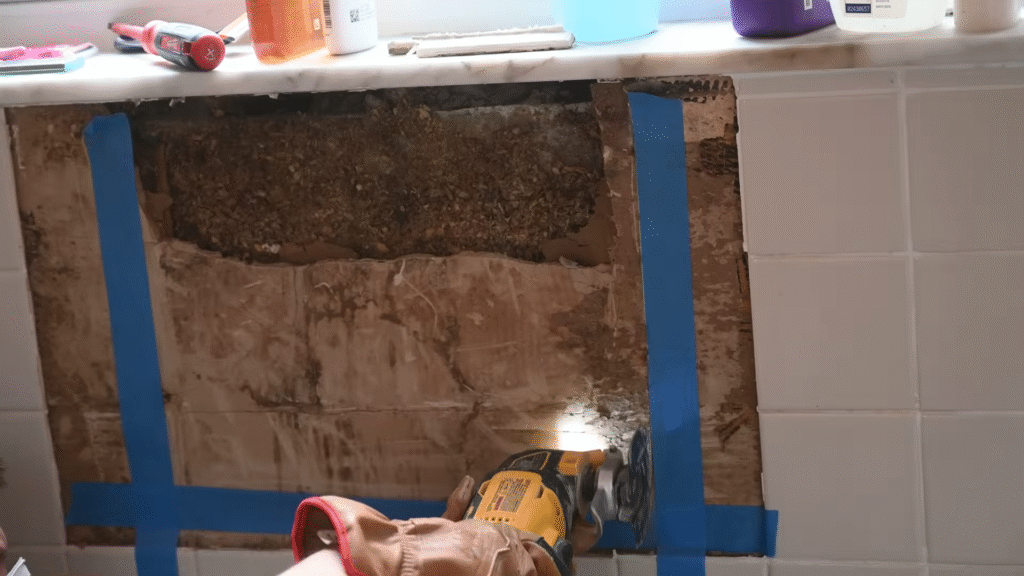
4. Remove the Damaged Section
Here’s where it gets messy. If the wall is soft, cracked, or moldy, you can’t just cover it up—you’ll need to cut it out.
- Mark the area: Use a pencil to outline the damaged spot. If it’s widespread, cut to the nearest stud or tile line.
- Turn off water supply (just in case): You don’t want to accidentally nick a pipe without knowing where the shut-off is.
- Cut it out: Using a utility knife or oscillating tool, carefully cut out the damaged drywall or cement board.
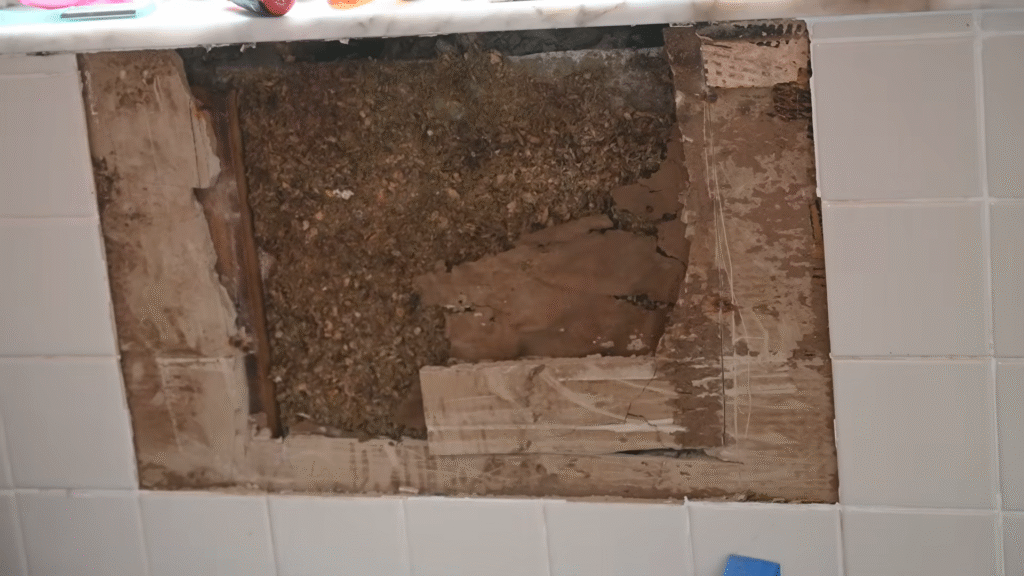
- Inspect behind the wall: This is the big reveal. Look for black mold, wet insulation, or leaking pipes.
When I once pulled off a tile, I discovered mold had painted the back of the wall green like abstract art. The culprit? A hairline crack in the caulk line. Don’t underestimate how far water travels.
5. Dry and Treat the Area
Water is sneaky—it seeps, spreads, and lingers. Before you rebuild, you must dry the area completely.
- Ventilation: Set up a fan or dehumidifier and let the area air out for at least 24–48 hours.
- Mold treatment: Spray the area with a 1:3 bleach-to-water solution or use a commercial mold killer.
- Replace insulation if needed: Wet fiberglass insulation is useless—swap it with new, mold-resistant insulation.
Skipping this step is like putting new shoes on wet socks—you’ll just end up with the same soggy mess.
6. Install New Backer Board or Drywall
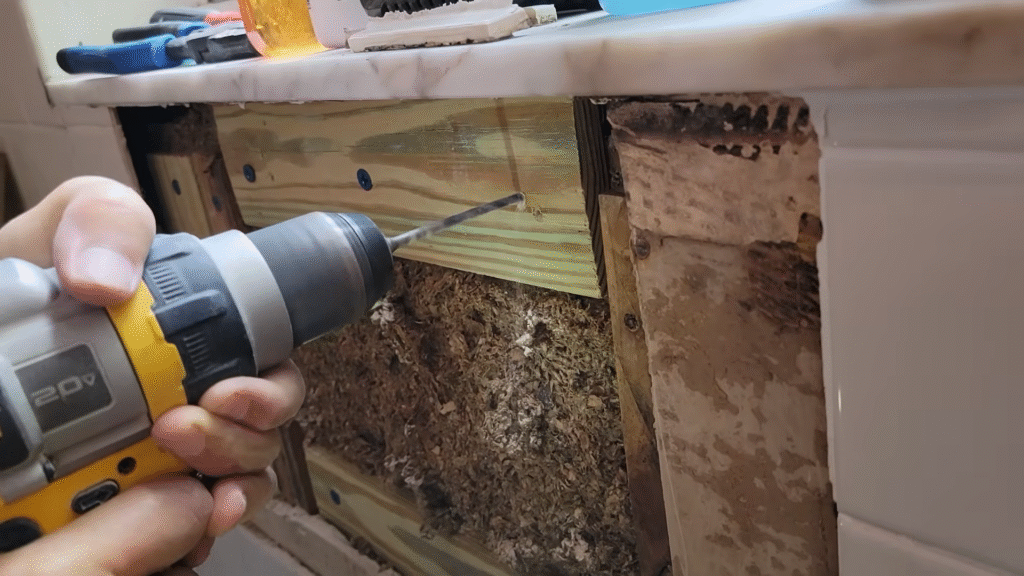
Here’s where you rebuild. But the material you choose depends on where the damage is located.
- Inside the shower (wet zone): Use cement backer board or foam tile backer board. These materials don’t break down with moisture.
- Outside the shower (dry zone): You can use moisture-resistant drywall (green board), but always seal it with waterproof primer.
Steps:
- Cut the board to fit the hole you removed.
- Secure it to the wall studs with corrosion-resistant screws.
- Tape the seams with fiberglass mesh tape.
- Apply a thin layer of thin-set mortar over the seams.
- Roll on a waterproofing membrane (like RedGard).
Think of this step as putting on armor—your wall needs protection before facing daily showers.
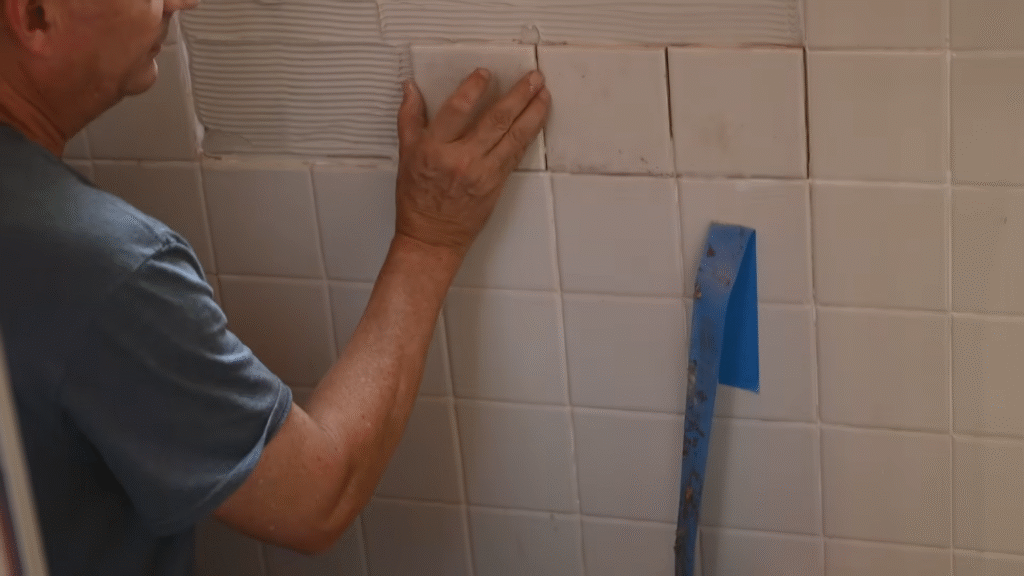
7. Retile or Refinish the Wall
Now comes the fun part—making your shower wall look beautiful again.
- For tiled walls:
- Spread thin-set mortar with a notched trowel.
- Press tiles firmly into place, using spacers.
- Let them cure for 24 hours.
- Apply grout, then wipe clean with a damp sponge.
- Seal grout after curing to keep water out.
- For painted walls outside the wet zone:
- Prime with mold-resistant primer.
- Apply two coats of semi-gloss bathroom paint.
When I re-tiled my shower, I chose subway tiles. Halfway through, I realized I hadn’t planned for the pattern around the faucet. Cue a late-night YouTube binge and a crash course in tile cutting. Moral of the story: always plan your tile layout before mixing mortar.
8. Seal Everything with Caulk
Even the prettiest wall will fail if you skip sealing. Use 100% waterproof silicone caulk along:
- The joint between the tub/shower pan and the wall
- Inside corners of the shower
- Around fixtures like faucets and showerheads
Smooth it with your finger or a caulk tool for a professional finish. A good caulking job is like the zipper on your raincoat—without it, everything underneath gets soaked.
9. Prevent Future Damage
Fixing the wall is half the battle. Keeping it intact for years is the real win. Here’s how:
- Routinely check caulk and grout: Reapply as soon as cracks appear.
- Ventilate properly: Run your bathroom exhaust fan for at least 20 minutes after each shower.
- Use a squeegee: Wiping down tiles after showers reduces water buildup by 70%.
- Inspect annually: Look for early warning signs like discoloration or soft spots.
A little preventive care now saves you from another weekend spent with a pry bar later.
10. Cost of Fixing a Bathroom Shower Wall
Let’s talk numbers, because repairs always come down to budget.
- DIY repair: $100–$500 depending on materials (mostly tiles, mortar, caulk, and backer board).
- Professional repair: $800–$2,500+ depending on wall size and water damage extent.
According to HomeAdvisor, the average shower repair costs about $1,200. So even if you spend $300 DIY, you’re saving nearly a grand. That’s a new bathroom vanity or a fancy showerhead upgrade right there.
Conclusion
Fixing a bathroom shower wall might feel intimidating at first, but once you break it into steps—remove, dry, rebuild, retile, and seal—it’s completely doable. The key is not just patching what you see, but addressing the hidden issues behind the wall.
I’ve learned from experience that skipping steps or rushing usually means redoing the job later (and trust me, no one wants to re-cut tiles twice). Take your time, use the right materials, and you’ll end up with a wall that’s not only sturdy but also looks brand new.
Think of it this way: your shower wall is like a shield. If you repair it properly, it’ll stand strong against daily steam, splashes, and the occasional shampoo bottle mishap for years to come.
FAQs
1. Can I just patch over damaged drywall in my shower?
No, never. Shower areas require cement backer board or another waterproof material. Drywall, even “green board,” will eventually fail with direct water exposure.
2. How long does it take to fix a shower wall?
For a small repair, plan about 2–3 days to account for drying, installing, tiling, and sealing. Larger projects may take a week.
3. Do I need to replace all tiles if only a few are cracked?
Not necessarily. If the damage is localized, you can replace just the affected tiles. But always check for water damage underneath before re-tiling.
4. Is mold behind the shower wall dangerous?
Yes. Mold can cause respiratory issues, allergies, and structural damage. Always remove it completely before closing the wall.
5. Should I waterproof the entire shower wall or just the repaired section?
If you’re already repairing, it’s best to waterproof the entire shower wall. It adds extra protection and peace of mind.